The kitchen is one of the busiest areas in any home, which also makes it one of the most vulnerable to water damage. From leaking sinks to malfunctioning appliances, even a small issue can quickly turn into a major problem. What may start as a minor drip can spread beneath cabinets, warp flooring, and create hidden moisture that leads to long term damage. Water Damage Restoration Salt Lake City in the kitchen is essential to restoring the space to a safe, clean, and fully functional condition.
Why Kitchens Are Prone to Water Damage
Kitchens are filled with water sources that are used daily, making them more susceptible to leaks and moisture related issues. Sinks, dishwashers, refrigerators, and plumbing connections all increase the risk of water damage over time.
Frequent use means that even small problems can go unnoticed until visible damage appears. Water can seep into cabinets, under flooring, and behind walls, creating hidden issues that may worsen if not addressed quickly.
The combination of moisture and organic materials also creates an environment where mold can develop. This makes early detection and restoration especially important in kitchen spaces.
Common Causes of Kitchen Water Damage
Water damage in the kitchen can result from several sources. One of the most common causes is a leaking sink. Drips from pipes or loose connections can slowly damage cabinets and surrounding areas.
Dishwashers are another frequent culprit. Faulty hoses or improper installation can lead to water pooling on the floor or behind cabinets. Refrigerators with water dispensers or ice makers can also leak, especially if connections become worn.
Clogged drains can cause water to back up and overflow, leading to surface and hidden damage. In some cases, worn seals or damaged fixtures can allow water to escape during normal use.
Understanding these causes can help you identify problems early and take action before damage spreads.
Signs of Water Damage in the Kitchen
Recognizing the signs of water damage can help you act quickly and prevent further issues. One of the most noticeable signs is discoloration on cabinets or walls. Stains often indicate that water has been present for some time.
A musty odor is another warning sign. This smell can suggest hidden moisture or mold growth behind surfaces. Even if everything looks normal, the odor may reveal a deeper problem.
Warped or swollen cabinets are also common indicators. When wood absorbs moisture, it can expand and lose its original shape. Peeling finishes or bubbling surfaces can also point to water damage.
Increased humidity or dampness in the kitchen may signal that moisture is not properly controlled. Identifying these signs early can help limit the extent of the damage.
The Kitchen Water Damage Restoration Process
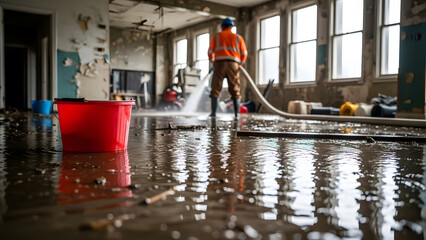
The restoration process begins with identifying the source of the water. Fixing the issue is essential to prevent further damage. Once the source is addressed, the next step is removing any standing water.
Drying the affected area is critical. Moisture can remain trapped in cabinets, flooring, and walls, so thorough drying ensures that hidden areas are treated. Proper ventilation and dehumidification help speed up this process.
Cleaning and sanitizing follow. Kitchen areas require extra attention because they are used for food preparation. Removing contaminants and odors helps restore a safe environment.
Damaged materials may need to be repaired or replaced. This can include cabinets, flooring, or sections of drywall. The goal is to return the kitchen to its original condition while ensuring durability.
Impact of Water Damage on Kitchen Materials
Water can affect different kitchen materials in various ways. Wood cabinets are particularly vulnerable, as they can swell, warp, or develop mold when exposed to moisture.
Flooring can also suffer damage. Materials like laminate or hardwood may buckle or separate when water seeps underneath. Even tile floors can be affected if moisture reaches the subfloor.
Countertops and backsplashes may appear resistant, but water can still penetrate seams and edges. Over time, this can weaken adhesives and cause separation.
Understanding how water impacts these materials highlights the importance of thorough restoration and proper drying.
Preventing Water Damage in the Kitchen
Preventing water damage starts with regular maintenance. Checking under sinks for leaks and ensuring that connections are secure can help catch problems early.
Appliances should be inspected periodically. Replacing worn hoses and ensuring proper installation can reduce the risk of leaks. Keeping drains clear also helps prevent water buildup.
Sealing gaps and maintaining proper ventilation can reduce moisture levels. Using exhaust fans and ensuring good airflow helps keep the kitchen dry.
Being proactive with maintenance can significantly reduce the chances of water damage and protect your kitchen from costly repairs.
Why Immediate Restoration Is Important
Acting quickly when water damage occurs can make a significant difference. The longer moisture remains, the more damage it can cause to materials and structures.
Mold can begin to develop in a short period, especially in warm and humid kitchen environments. Once it spreads, it becomes more difficult to remove and can affect air quality.
Immediate restoration helps limit damage, reduce repair costs, and restore the kitchen more efficiently. Quick action also helps maintain a safe and healthy space for daily use.
Conclusion
Water damage restoration in the kitchen is essential for protecting one of the most important areas of your home. By understanding the causes, recognizing the signs, and acting quickly, you can minimize damage and restore your space effectively.
Proper maintenance and preventive measures can help reduce the risk of future issues. Taking care of your kitchen ensures that it remains a safe, functional, and comfortable place for everyday living.
A well restored kitchen not only looks better but also supports a healthier environment. Addressing water damage promptly allows you to maintain both the beauty and functionality of your space.