Insulation is an important component of a comfortable, healthy, and energy-efficient home. It can, however, deteriorate over time, or become compromised by pest infestations, moisture damage, or other factors.
When this happens, removing insulation becomes necessary to maintain building health and safety. The removal process requires special tools and adherence to strict safety protocols. Contact Perth Insulation Remover for professional help.
Insulation removal can be a messy and time-consuming project, but it is vital for your home’s safety and energy efficiency. Old insulation can harbor dust, mildew, pests, and other pollutants that negatively impact indoor air quality. It can also trap moisture, leading to mold and other structural damage. Replacing old insulation with new, high-quality materials is a cost-effective way to improve your home’s comfort and health.
Before you begin the removal process, familiarize yourself with proper insulation removal techniques and safety guidelines to prevent health hazards. Use a vacuum cleaner with an attachment designed for insulation removal to minimize dust, and wear protective gear such as gloves, goggles, and a mask. In addition, turn off your heating, ventilation, and air conditioning (HVAC) system to prevent dust from circulating throughout the home. It is also important to cover ductwork and vents with plastic sheeting to minimize dust infiltration.
During the removal process, misting the insulation with water can help minimize dust and other respiratory irritation. This simple technique can greatly improve air quality and make the process much less labor intensive. When you’re ready to dispose of the old insulation, double-bag it to minimize airborne particles from escaping and to prevent the spread of allergens. You can also consider renting a dumpster to streamline the waste management and disposal process.
In addition, it is essential to properly prepare the attic space for insulation removal, including repairing and sealing any damage and ensuring adequate access and lighting. It is also crucial to determine the type of insulation and its condition before beginning the process, as some types of insulation require special handling or disposal methods. Finally, remember to follow all local and state regulations regarding waste disposal, as improper disposal can lead to harmful environmental impacts. For these reasons, it may be a more practical option to hire professionals who have the specialized equipment and knowledge to handle insulation removal efficiently. They can safely and effectively remove contaminated, damaged, or old insulation from crawl spaces, attics, and other challenging areas. They can also advise you on the best replacement options for your home.
Safety
Insulation is a key component of home energy efficiency and indoor comfort. Over time, it can lose its effectiveness and may need to be replaced. When re-insulating, it is important to follow certain precautions and safety measures to avoid potential hazards. These include proper ventilation, covering sensitive items and creating a work space that minimizes dust spread. In addition, safety protocols should be reviewed and practiced to ensure that everyone involved in the process is familiar with how to respond in an emergency situation.
Before starting the insulation removal process, it is critical to conduct a thorough inspection to determine the type of insulation present in the home. Different insulation materials, such as fiberglass, cellulose, and foam board, require unique handling procedures. The inspection will also help identify any potential safety risks and inform the appropriate safety measures to take.
It is also recommended to wear personal protective equipment (PPE) when removing insulation. This includes gloves, goggles, and a mask to protect against dust particles and other irritants. Moreover, it is important to ensure that all PPE is in good working condition before using it. It is also advisable to double-bag all discarded insulation waste and follow local recycling guidelines.
Lastly, it is recommended to mist the insulation with water before removing it to minimize the release of dust particles into the air. This simple technique can significantly improve indoor air quality and reduce the risk of respiratory irritation. It is also advisable to vacuum the attic space after insulation has been removed and to wipe down surfaces to remove any remaining dust.
In addition to enhancing indoor air quality, removing old insulation can also improve energy efficiency and save money on utility bills. However, DIY insulation removal can be a challenging project that requires a significant amount of time and physical effort. Therefore, homeowners should weigh the pros and cons of this project to ensure that it aligns with their skillset, availability, and comfort level. Moreover, homeowners should seek professional assistance when tackling hazardous projects such as mold or pest infestations.
Preparation
Insulation removal is a time-consuming project, but it’s also important to follow specific safety steps. These precautions minimize health risks, physical injury, and environmental contamination.
In addition to personal protective equipment, a person who is removing insulation should ensure that the work area is clear of obstructions and that all items are secured. Plastic sheeting can help isolate the work area and prevent dust from spreading outside of it. In addition, the attic should be inspected for signs of mold growth, water damage, pest infestation, and gaps around plumbing or electrical wiring. If these issues are detected, they should be addressed before installing new insulation.
Professionals follow a detailed process when addressing attic insulation, allowing them to provide more effective results than DIY enthusiasts. Their comprehensive approach addresses any moisture or pest problems, seals gaps with caulk, and identifies areas that are missing or inadequately insulated. This improves air quality, reduces energy costs, and provides a more comfortable home environment.
Blown-in cellulose insulation is typically blown in place, a method that requires extensive cleanup and disposal of contaminated materials. It’s possible to remove this type of insulation yourself, but it’s best to consult a professional or make sure that you have the proper PPE for the job.
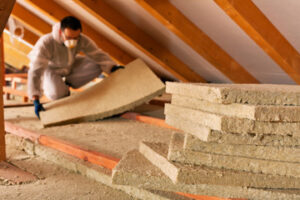
Fiberglass batt insulation comes in large rolls or pre-cut panels and is stapled to attic joists. This type of insulation is easier to remove than blown-in cellulose, but it’s still important to wear gloves and a mask to limit exposure to fiberglass particles. The resulting dust can irritate the skin and respiratory system. Once the insulation is removed, it should be placed in heavy-duty plastic bags for disposal.
Spray foam is a more complex type of insulation, and it requires special tools and solvents for safe removal. A professional can efficiently and effectively remove this type of insulation without causing structural damage to the attic or other parts of the home.
The final step of the insulation removal process involves inspecting the attic for any remaining insulation and preparing it for new installation. Professionals can advise homeowners on the type of insulation that’s most appropriate for their homes, based on local regulations and their budgets.
Equipment
The equipment needed to remove insulation varies depending on the type of insulation and the attic space. Blown cellulose and fiberglass batts require insulation removal vacuums, while foam board and spray foam are best removed with special tools or scrapers. Safety gear like a respirator and goggles protects against airborne particles and skin irritants. In addition, a tarp or other protective cover should be placed over the attic floor to catch falling debris. Other important tools include a ladder, commercial or HEPA-filtered shop vac, a rake, and a dustpan. Having these tools ready reduces the risk of injury and speeds up the process by keeping workers organized.
Before starting to remove insulation, it is important to prepare the work area by laying down plastic sheeting and sealing off areas. This will help minimize dust and contamination from spreading to other parts of the home. In addition, it is recommended to take regular breaks to avoid heat exhaustion and fatigue.
Once the workspace is set up, it is time to begin. Begin by positioning the insulation removal vacuum hose over the spot from which you want to vacuum. Then, simply turn on the machine and begin to suction up the old insulation. The machine will separate the insulation from the drywall, making it easier to remove. The insulation will then be deposited into the insulation removal vacuum bag, where it can be disposed of later.
The next step is to use the rake or dustpan to gather any remaining loose insulation and transfer it into waste bags. It is recommended to have plenty of these bags on hand as the insulation can be quite messy. Once the rake and dustpan have been used, it is a good idea to vacuum again with the insulation removal vacuum. This will ensure that all traces of the old insulation have been removed from the attic.
If you are unsure about your ability to safely remove and dispose of insulation, it is highly recommended to hire a professional service. Not only will a professional know the proper removal procedures, but they can also provide valuable insights into the best type of new insulation for your home. Additionally, professionals will be familiar with local regulations regarding the handling and disposal of hazardous materials.